No Fence Stretcher No Problem Fence Repair
If you own cows, you’re guaranteed a lifetime of learning to become a professional fence stretcher. Just when you think you have a reasonably tight barbed wire fence, it’s sure bet that the cows are out there busily trying to figure out how to loosen it up again.
When I stretch new barbed wire fence, I do it with a come along, a chain, and a wire grip. I can explain that more fully later, but for now I want to talk about two different tools and two techniques I use to stretch an existing fence that seem to work pretty well. With both of these tools you’ll also need a good pair of fencing pliers and some extra barbed wire to splice with.
Repairing A Barbed Wire Fence Using A Claw Hammer And Fencing Pliers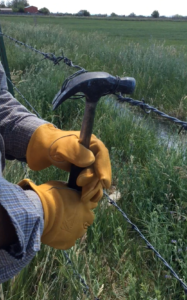

With a claw hammer and a pair of fencing pliers you can splice and tighten a broken wire relatively fast with a reasonably low amount of fuss. To accomplish this, take one of the broken wire ends and create a small loop, then cross the wire over itself and wind the end around the body of the wire three or four times. Repeat this process with the other broken end.
Next thread a piece of splicing wire through one of the loops and splice it to the wire by bending it over onto itself and making three or four twists in the afore mentioned manner. The splice wire should be long enough to thread through the opposing loop plus an additional five or six inches. Now untwist the splice wire and strip off all the barbs with your fencing pliers so that it will slide through the opposing loop more easily. After you’ve stripped the barbs off twist it back together. Note: On some barbed wire brands, the barb is twisted around both strands of wire. If this is the case, it’s not the end of the world. It will just require a little extra effort with your fencing pliers to remove the barbs.
Now take the opposing wire in one hand and thread the splice wire up through the loop you created earlier. Pull the splice wire through the loop as far as you can, then lay the neck of your hammer which exists between the head and the claws underneath the splice wire and across the loop. Next, put the splice wire across the neck of the hammer then around the side and down between the claws. After that, begin winding the splice wire around the neck of the hammer as you continue to keep the hammer laying across the loop.
If you’ve followed all the above steps correctly, you’ll be able to stretch the wire just as tight as you need it to be. When you’ve wound the wire sufficiently tight, keep ahold of the hammer handle with one hand. With the other hand, firmly hold the splice wire where it goes up through the loop and the loop itself with your fencing pliers so that the wire can not slip. When you’ve got ahold of the splice wire and the loop with your pliers, you can unwind the wire a couple of turns from your hammer by turning the handle in the opposite direction. After all of that, bend the splice wire over onto itself in a “U” shape.
After you’ve bent the wire over onto itself, it won’t slip anymore, so at this point can let go with the pliers and finish unwinding the wire from the hammer. All you have left to do now is twist the wire back over itself three or four turns. Using this method you can have a wire spliced and stretched just as tight as if you’d done it with a fence stretcher.
The Texas Fence Fixer Makes A Great Fence Stretcher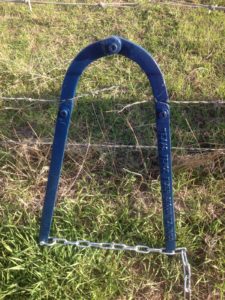

The Texas Fence fixer is by far my favorite fence stretcher type of tool. It simplifies and speeds up the job compared to the fence stretcher that everyone is used to using and I’m sure every rancher has at least one of among their collection of fence repair equipment. Using a conventional fence stretcher requires cutting and splicing a sagging wire. On the other hand, with a Texas Fence Fixer there is no cutting, splicing or kinking of the wire.
To use your Texas Fence Fixer, simply spread the hinged handles apart. This will open up a slot for the wire to go in at the top of each handle. Place the top of the tool underneath and perpendicular to the sagging wire, laying the wire across the top of the tool and inside the slots that opened up when you spread the handles apart. Next, pull the handles of the fence fixer together. You will find that the slots will close down upon and grip the wire. As the jaws gripping the wire come together, you’ll be pulling all the sag out of your once loose wire. When you have the wire stretched sufficiently, fasten the handles together with the attached chain. The excess wire that you pulled will be bulging up in the middle of the fence fixer in a “U” shape.
Now take a short piece of barbed wire and wrap one end of it at one side of the Fence Fixer with three or four turns. Repeat what you just did with the other end of the short wire on the opposite side of the Fence Fixer so that the short wire is tied across U shaped wire. Place the handle of your fencing pliers between the U shaped wire and the short wire you tied across it and twist them together.
That’s it. You’re done other than unfastening your Texas Fence Fixer. As the video will show the process is quick and simple. If your like me you have a dozen other tasks waiting in line for your attention so the quicker you can get that fence put back together and move on to the next thing the better. Am I right? I’ve used a conventional fence stretcher a bit through the years and in my opinion the Texas Fence fixer beats it hands down doing the same job and leaves the wire in better shape.